

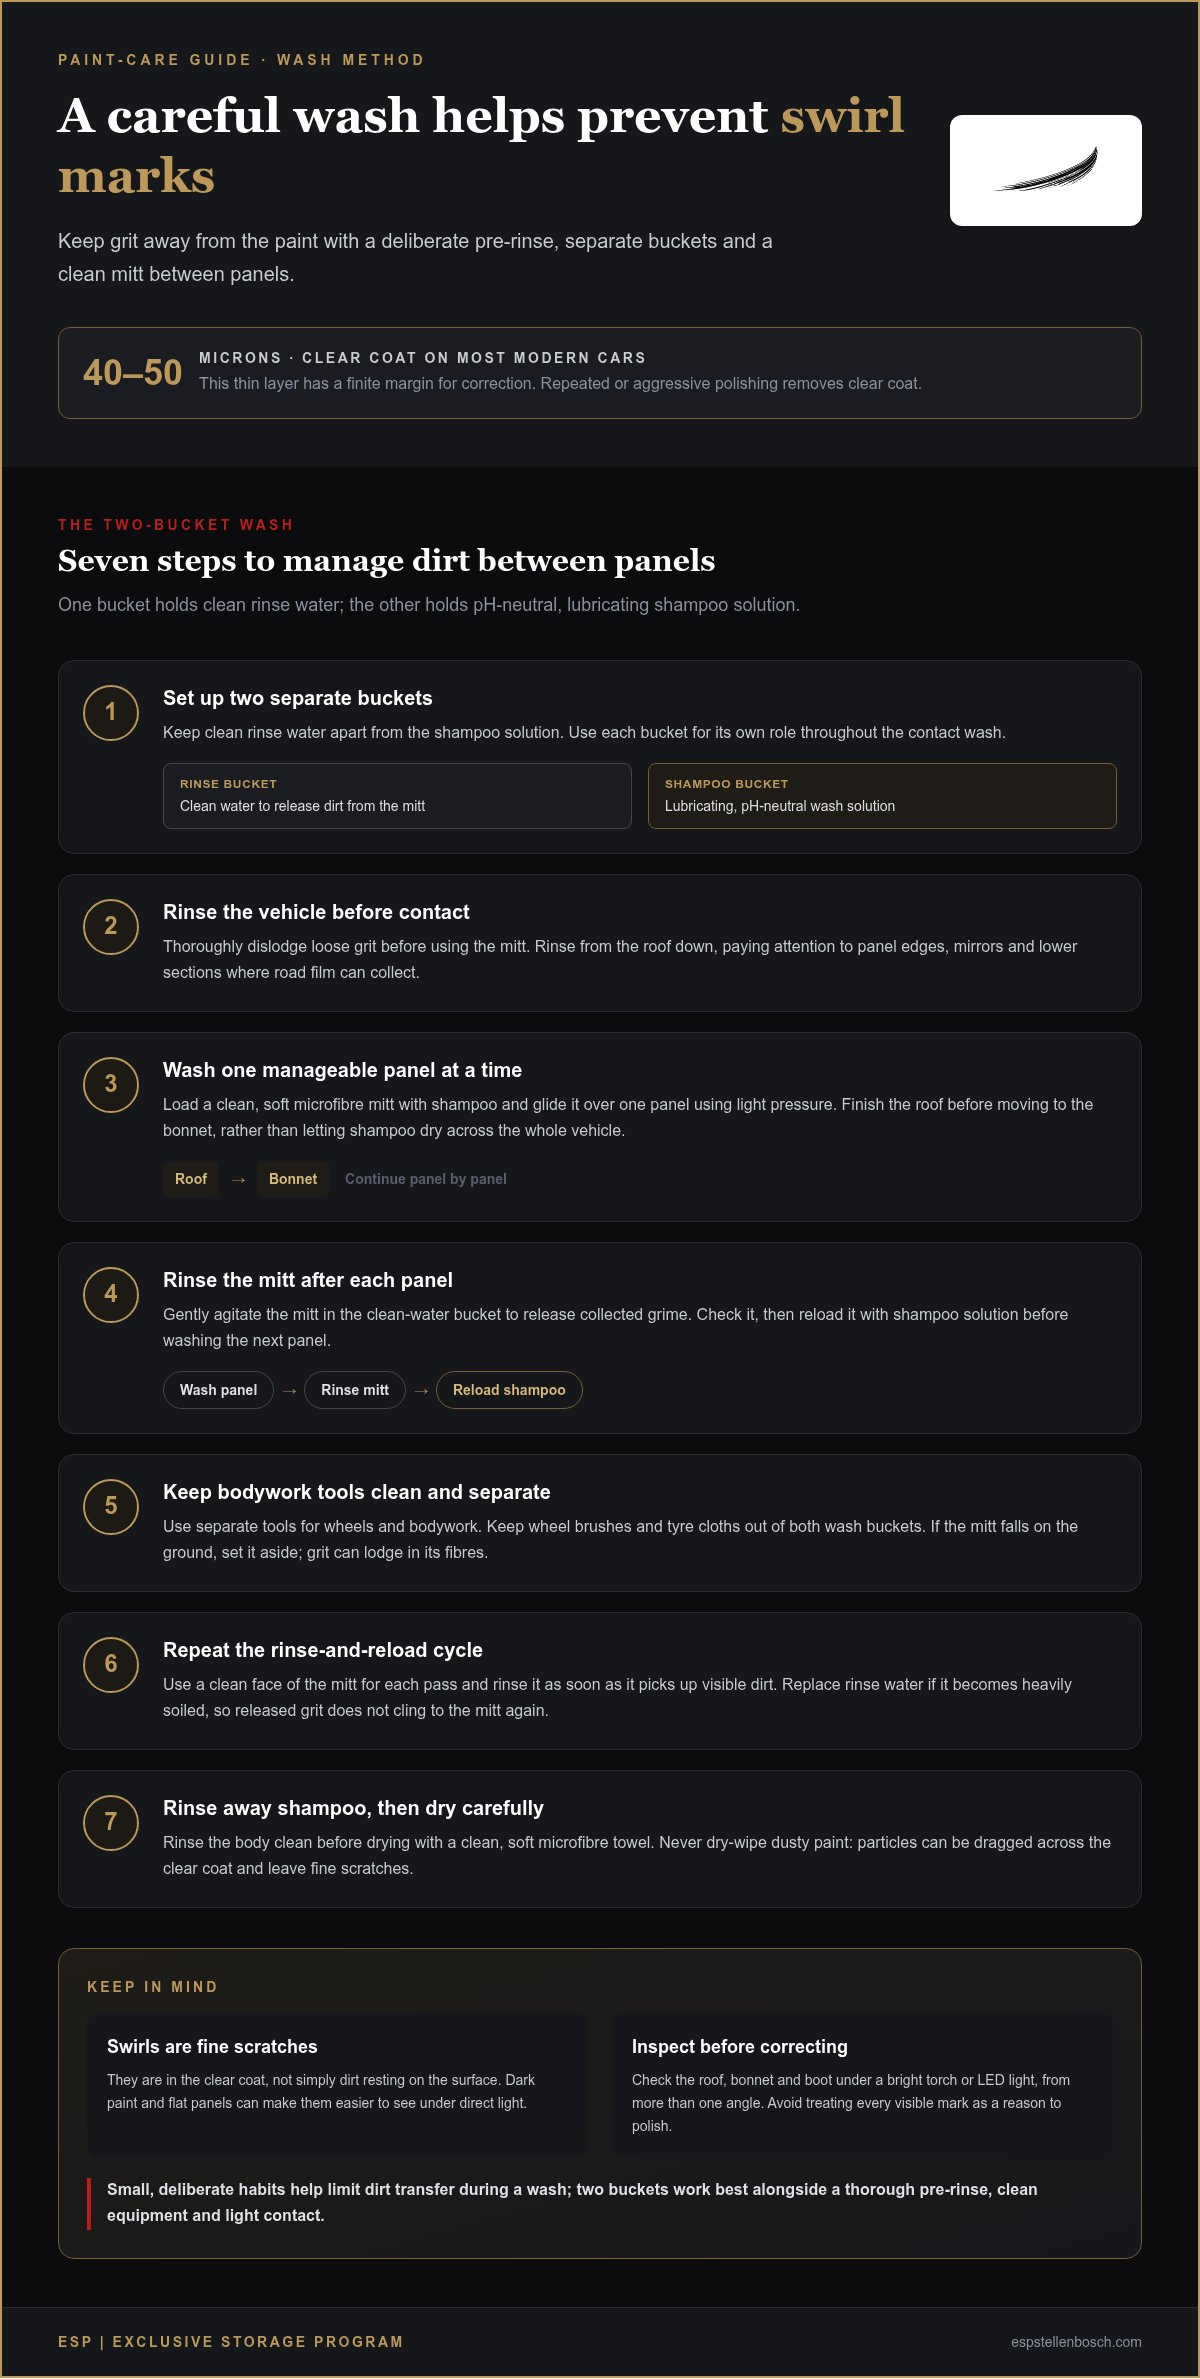
Car detailing without swirl marks starts with a careful wash. Use two buckets, one for a pH-neutral, lubricating shampoo solution and one for clean rinse water. Rinse your mitt between panels, and rinse loose dirt from the vehicle before washing so grit is less likely to drag across the paint.
Swirl marks don’t always come from dramatic damage. They often build up during routine care: a dusty cloth, a dry wipe or dirt caught between the mitt and paint. The fine marks may be subtle, but they show more clearly under direct light, particularly on dark paint and flat panels.
This guide explains what causes fine scratches and how to reduce the risk at each stage of a wash. Learn how to prepare the vehicle, use the two-bucket method, choose a lubricating, pH-neutral shampoo and dry the paint carefully. Small, deliberate habits help preserve a clean finish.
Key Takeaways
- Spot common sources of fine paint scratches, from trapped grit to dry wiping, before they become a regular part of your wash routine.
- Use a two-bucket wash to keep rinsing water separate from shampoo solution and reduce the chance of carrying dirt between panels.
- Choose a pH-neutral shampoo with lubricating surfactants, then work from cleaner areas towards more contaminated sections.
- Understand why clear-coat thickness matters when deciding whether swirl marks need correction or simply gentler ongoing care.
- See where PPF Paint Protection Film may fit into a broader approach to caring for your vehicle’s finish.
What causes swirl marks on car paint?
In South Africa, tailor paint care and protection to the vehicle’s condition, contamination and existing protection, rather than following a fixed calendar. Inspect the paint after washing. Accumulated grime, fading water behaviour or visible defects may signal that your care routine needs attention.
- Understand the clear coat’s limits. A swirl mark is a fine scratch in the clear coat, not simply dirt sitting on the surface. Clear coat on most modern cars measures about 40 to 50 microns thick. That thin layer provides a finite margin for correction. Repeated or aggressive polishing removes clear coat, so don’t treat every visible mark as a reason to polish.
- Clean the wheels and tyres first. Brake dust and road grime collect around wheels and tyres. If you wash the body first, contamination can transfer from your mitt or cloth to cleaner paint. Use separate tools for wheels and bodywork, then move to the paint with clean equipment. This keeps the dirtiest stage away from the finish you’re preserving.
- Choose tools that limit abrasion. Use a clean, soft microfibre wash mitt for the body and a separate soft microfibre towel for drying. Set aside any cloth that touches the ground, where grit can lodge in its fibres. Keep wheel brushes and cloths away from paintwork tools. Dry-wiping dusty paint can drag particles across the clear coat and leave scratches.
- Apply protection after washing. Wax and sealant sit on the surface and can add a protective layer. Ceramic coatings can also help resist swirl marks, but they don’t make paint swirl-proof. Careful washing is still essential. Apply wax or sealant after washing and follow the product instructions. Protection can reduce direct exposure, but won’t remove scratches already in the clear coat.
- Match paint correction to the defect. Polishing corrects swirl marks and other clear-coat imperfections. A single-stage polish can address light marks; moderate to heavy swirls call for a two-stage correction process. Correction removes damaged clear coat, so excessive polishing can thin the finish. Temporary fillers may hide scratches, but don’t remove the damaged layer.
- Inspect before deciding to polish. Check the roof, bonnet and boot under a bright torch or LED light, since flat panels can show swirls clearly. Dark colours also make fine marks easier to see. Inspect from more than one angle before choosing correction. If a mark catches the light but doesn’t justify removing more clear coat, focus on preventing further wash-induced damage.
Two-bucket washing
- Set out two clearly separate buckets. Fill one with clean water for rinsing and the other with shampoo solution for washing. Keep their roles distinct throughout the contact wash. Use the rinse bucket to release loose dirt from the mitt, then reload it with cleaning solution from the shampoo bucket. This separation is a practical foundation for car detailing without swirl marks.
- Prepare the vehicle before using the mitt. Rinse the body thoroughly to dislodge loose grit, then start the contact wash with both buckets ready. On a heavily soiled surface, the mitt collects contamination straight away. Removing loose material first reduces the chance of particles becoming trapped beneath the mitt and being dragged across the finish.
- Wash a manageable section at a time. Dip the clean mitt into the shampoo bucket, then glide it over one panel with light pressure. For example, finish the roof before moving to the bonnet, rather than leaving shampoo to dry across the whole vehicle. Short, controlled passes make it easier to track which areas the mitt has touched.
- Rinse the mitt before reloading it. After each panel, place the mitt in the clean-water bucket and gently agitate it to release collected grime. Check the mitt before returning it to the shampoo solution. This rinse-and-reload cycle is central to car detailing without swirl marks because it helps limit dirt transfer between panels.
- Keep the buckets and tools in their own roles. Do not dip a wheel brush or a cloth used on tyres into either bucket during the body wash. If a mitt falls onto the ground, set it aside instead of putting it back in the shampoo. Grit caught in its fibres can scratch paint, even when the wash solution looks clean.
- Repeat the rinse-and-reload cycle until the body is clean. Use a clean face of the mitt for each pass, and rinse it as soon as it picks up visible dirt. Replace the rinse water if it becomes heavily soiled, so released grit does not cling to the mitt again. Rinse away the shampoo before drying with a clean towel.
- Make the method part of a deliberate routine. Two buckets do not remove the need for clean equipment, a thorough pre-rinse or light contact. They give rinsing and shampooing separate roles, helping you manage contamination throughout the wash. For a carefully managed wash, explore ESP | Exclusive Storage Program vehicle care and preservation.
WHY IS AVOIDING SWIRL MARKS A GOOD IDEA?
- Remove loose contamination before contact. Rinse the vehicle thoroughly from the roof down before using a wash mitt. This clears loose grit that could otherwise be pulled across the paint. Pay attention to panel edges, mirrors and lower sections, where road film can collect. Starting with less loose contamination leaves fewer particles for the mitt to disturb.
- Use a pre-wash to loosen stubborn dirt. Apply a suitable pre-wash cleaner and leave it for a few minutes before rinsing. For snow foam, cover the vehicle from the top down, let it dwell for a few minutes, then rinse thoroughly. These steps loosen and remove dirt before the mitt touches the paint.
- Wash the cleanest areas first. Start at the roof, then move to the windscreen, bonnet and upper sides. Wash the front bumper and rear end next, leaving the lower sides until last. These panels collect heavier road grime. This sequence limits the risk of dragging contamination from dirty sections onto cleaner paint.
- Move the mitt in straight lines. Use light pressure and straight passes instead of circular motions. Circular washing can leave curved marks that stand out under direct light; fine straight-line scratches are less conspicuous. Work one panel at a time, and turn the mitt to a clean face when it picks up visible grime.
- Separate cloths by task. Keep clean microfibre cloths for paint separate from those used on dirtier areas, such as door shuts. Never use a cloth that has touched the ground on the bodywork. To dry, gently draw a soft, clean microfibre towel over the panel instead of rubbing in tight circles.
- Avoid washing methods that repeatedly drag dirt. Automatic tunnel or conveyor washes use spinning bristles that can carry contamination against the paint. Incorrect washing is estimated to cause 90% of swirl marks. If hand washing isn’t possible, a touchless automatic wash avoids brush contact, though it doesn’t replace careful hand washing for close attention to each panel.
- Prevent marks rather than relying on correction. Each wash can preserve the finish or add fine scratches. Repeated polishing removes clear coat, so careful pre-washing, straight passes and gentle drying help reduce the need for correction. A deliberate sequence also makes it easier to keep dirty tools away from clean paint.
Choosing a pH-neutral, lubricating car shampoo
- Choose shampoo made for vehicle paint. Select a pH-neutral car shampoo formulated with surfactants and concentrated lubricants for contact washing. These ingredients help the mitt glide across the surface rather than catch on particles and drag them over the finish. Household detergent isn’t a substitute for shampoo designed for vehicle paint and contact washing.
- Read the label before adding shampoo to water. Follow the product’s dilution and use instructions. Concentrated formulas need the correct dilution to create a usable wash solution; adding extra shampoo doesn’t replace lubrication or careful technique. Measure as directed and mix it into the designated wash bucket before bringing the mitt to the vehicle.
- Check the wash solution before each panel. Dip the clean mitt into the shampoo bucket and make sure it’s fully wet. A lubricated mitt should glide with light pressure. Don’t scrub a dry or resistant patch. If the solution becomes heavily contaminated, replace it before washing another panel so collected particles aren’t spread across the paint.
- Pair shampoo with a thorough pre-rinse. Shampoo lubricates the contact wash, but doesn’t remove the need to clear loose dirt first. Rinse the vehicle before using the mitt, especially around lower panels where road grime gathers. This leaves fewer loose particles for the mitt to encounter as it moves across the surface.
- Keep shampoo away from a drying surface. Work on a cool, wet panel and rinse the shampoo before it dries. For example, wash the bonnet and rinse it rather than leaving suds to evaporate while you clean the roof. Dried residue can make the finish harder to rinse and lead to extra wiping.
- Use a separate rinse stage with the two-bucket method. Keep clean water in one bucket and shampoo solution in the other. After washing a panel, rinse the mitt in clean water before reloading it with shampoo. This reduces the transfer of released dirt into the wash solution and helps keep the lubricant cleaner for the next pass.
- Assess how the mitt behaves as you wash. If it feels gritty or starts to drag, stop and rinse it rather than adding pressure. Check the panel and mitt for visible particles, then continue with a clean face and fresh solution. A pH-neutral, lubricating shampoo supports gentle contact, but clean tools and controlled movement still matter.
Common causes of swirl marks
- Don’t dry-wipe dusty paint. A dry cloth can trap dust between its fibres and the clear coat. Wiping a dusty bonnet moves those particles across the surface, leaving fine scratches. Rinse the vehicle before using a mitt or towel. If you notice dust after washing, rinse it away instead of wiping it off dry.
- Keep towels clean and separate. A drying towel used on door shuts or wheels can carry grit onto painted panels. Set aside separate cloths for those areas, and don’t use a towel on paint after it touches the ground. Before drying, check the towel for debris and use a clean section on each panel.
- Skip quick-detailer wiping on dusty paint. Spraying quick detailer over dust doesn’t lift particles clear of the finish. Wiping then presses and moves them across the clear coat. For example, after a dusty drive, rinse the paint before contact washing instead of using spray and a cloth as a shortcut.
- Don’t cover a dirty vehicle. Dust and grit trapped between a car cover and the paint can rub against the surface as the cover moves in the wind. Wash the car before covering it, and fit the cover without dragging it across the bodywork. A cover can’t prevent scratches if contamination is underneath it.
- Be selective with automatic washes. Tunnel and conveyor washes use spinning bristles that can carry dirt against the paint. If hand washing isn’t practical, a touchless automatic wash avoids brush contact. Rinse and dry the vehicle carefully afterwards, since water and remaining dirt can still affect the finish.
- Watch for marks from polishing. Inexperienced rotary-buffer use can leave holograms, which appear as rainbow-coloured trails under light. Inspect the paint under a bright torch after polishing, especially across the bonnet and roof. Removing those trails requires careful technique; polishing more aggressively can take off additional clear coat.
- Inspect a new vehicle rather than assuming its finish is flawless. New cars can already have swirl marks from improper dealership preparation. Check the bonnet and other flat panels under direct LED light before choosing correction. A visible mark doesn’t automatically call for polishing, because each correction removes some clear coat.
- Make prevention the priority. Most swirl marks begin with ordinary contact: a dusty wipe, a contaminated towel or a brush wash. Identify which step in your routine introduces friction, then change that step before polishing defects. For a considered approach to preserving vehicle paint, explore paint-preservation care.
ESP | Exclusive Storage Program: PPF Paint Protection Film
ESP | Exclusive Storage Program offers Paint Protection Film (PPF) for owners seeking an additional layer of paint protection. It can complement careful washing by helping protect the finish from everyday exposure, but it doesn’t make paint immune to swirl marks. Gentle maintenance remains essential.
Consider PPF as part of a broader preservation approach if you want added protection alongside a disciplined wash routine. ESP also offers Secure Indoor Storage, Drivers Club and Signature Membership for owners seeking complementary vehicle care and stewardship.
Contact ESP | Exclusive Storage Program to discuss Paint Protection Film (PPF) for your vehicle.
Make careful care part of the journey
Preserving a finish is less about achieving one flawless wash and more about building thoughtful habits around the vehicle. Let each inspection guide your next decision: maintain the paint gently, protect it where appropriate, and avoid polishing just to chase every mark. That considered approach is at the heart of car detailing without swirl marks.
If you’re planning the next stage of your vehicle’s care, ESP | Exclusive Storage Program offers Paint Protection Film (PPF), Secure Indoor Storage and Drivers Club membership. Each supports ownership and preservation in a different way, alongside the careful washing routine you’ve established.
Contact ESP | Exclusive Storage Program to discuss the right next step for your vehicle. Keep the routine deliberate, and enjoy every drive with greater confidence in how you care for your car.
Frequently Asked Questions
Should I Ignore Swirl Marks and When Should I Get It Fixed?
Light swirl marks can be left alone if they’re purely cosmetic and don’t bother you. Consider paint correction when defects are clearly visible in normal lighting or affect the finish you want to maintain. Before polishing, inspect the paint under a bright light and consider the clear coat’s limited thickness. Fillers may disguise marks temporarily, but polishing removes the damaged layer. Avoid repeated correction just to chase every fine imperfection.
How do you wash a car without causing swirl marks?
Start with a rinse, then wash with clean equipment and light contact. Work in manageable sections, using a fresh area of the mitt rather than pressing harder against stubborn dirt. Keep wheel-cleaning tools away from painted panels. Rinse off all shampoo after washing and dry with a clean microfibre towel. For example, if a lower door remains gritty, rinse it again instead of rubbing until it feels clean.
What tools and products prevent swirl marks during car detailing?
Use a soft wash mitt, a separate clean microfibre drying towel and dedicated tools for wheels. Choose a pH-neutral shampoo formulated with lubricating surfactants for contact washing. Keep cloths clean and set aside any that fall onto the ground. A torch or LED light helps inspect the finish before and after washing, particularly on dark paint where fine marks show clearly.
What is the two-bucket wash method and how does it reduce scratches?
The method keeps shampoo solution separate from clean rinse water. Load the wash mitt from the shampoo bucket, clean a panel, then rinse the mitt before loading it again. This gives collected dirt a place to leave the mitt instead of returning straight to the wash solution. For instance, after washing the bonnet, rinse the mitt thoroughly before moving to the next panel.
How should you dry a car without leaving swirl marks?
After rinsing away the shampoo, use a clean, soft microfibre drying towel. Lay it gently over a panel and draw it across the surface without scrubbing. Use a clean section as it becomes damp or picks up residue. Keep the towel off the ground and away from wheels or door shuts. For water in a mirror or trim seam, use a separate clean cloth.
How do you safely remove dust and dirt before washing a car?
Rinse the vehicle thoroughly before touching the paint, directing water over dusty panels and areas where road grime collects. A suitable pre-wash cleaner or snow foam can loosen dirt before contact washing; follow its instructions and rinse it away. Don’t wipe dust with a dry cloth or quick-detailer spray, as particles can drag across the clear coat. Treat visible grit as a reason to rinse again.
How can you polish a car to remove swirl marks without creating new ones?
First inspect the paint under a bright light and decide whether correction is needed. Light marks can be treated with a single-stage polish; moderate or heavy defects call for a two-stage correction process. Use suitable products and tools, and avoid aggressive polishing, which can remove too much clear coat. If you’re inexperienced with a rotary buffer, don’t improvise: poor technique can leave holograms, visible as rainbow-like trails under light.
What causes swirl marks in car paint and how can they be prevented?
Swirl marks are fine scratches in the clear coat, commonly caused when dirt is rubbed against paint. Dry wiping, contaminated towels, harsh washing tools and brush washes can all contribute. Prevent them by rinsing first, keeping paint and wheel tools separate, and checking cloths before use. A cover can also rub trapped debris against a dirty vehicle, so wash the paint before covering it.


